Android Dev Phone 1: to GIT Master and Back
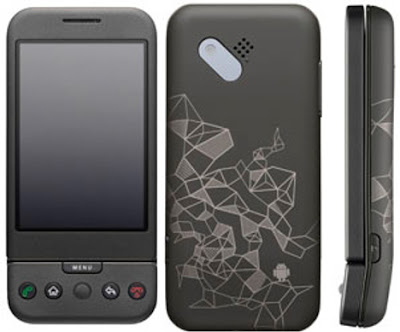 If you, like me, have a Android Dev Phone 1 (“ADP1” from now on), you are probably wondering how to take the latest version of the Android Source Code, the “GIT Master”, compile and put on your device.
I googled and googled and googled, finding some sparse material. But it’s all messed up: sometimes it was incomplete or partial, sometimes it was a matter of formatting/style, it could get very difficult to read. So, this post is my way of making it organic and organized.
Let’s get it started!
Prepare the Instruments
To build Android and flash the ADP1 we need different tools and set up some stuff. Because it would be redundant to explain here how to do every single one of those steps, I will just say what you need and where you find the official documentation to do it:
- Download and Install the Android SDK
- Configure the Android SDK for "On Hardware Debuging"
- Get the Source of the "GIT Master" from the Official Repository, get ready for Compilation BUT DO NOT COMPILE YET; this means stop when the how to says to execute the
makecommand - Download and Unzip JesusFreke (nice name, isn't it ;-) ) for ADP1; sometimes the ADP1 is also known as "Holiday" device
A couple of notes about the last task:
- JesusFreke is an great hacker that maintain an interesting firmware for both T-Mobile G1 and ADP1
- the ADP1 is also known as "Holiday" because is the same device that the Google Employees received during some holiday period from their company as gift; and from there the first unlocked firmware were ripped ;)
Access Points
Your current devices has the Access Points (APN) already configured. It would be a good idea to bring them on the firmware we are going to build too. Connect your device if you didn’t do it already and execute on the command line:
[code lang=”bash”]
$ cd [YOUR_ANDROID_SOURCE_ROOT]
$ adb pull /system/etc/apns-conf.xml development/data/etc/apns-conf_sdk.xml
[/code]
This will use the adb command to pull the APNs from the phone: that’s why we needed the Android SDK.
Update: I think this doesn’t really work. But it doesn’t matter, does it? We are going to do a full backup of the phone anyway.
Terminal Emulator (optional step)
There is a Terminal Emulator application that is installed by default, however it does not appear in the launcher. To stop this madness, edit the file ./development/apps/Term/AndroidManifest.xml and add a new <category> to the <intent-filter> section to make it look like:
[code lang=”xml”]…
<intent -filter>
</intent> …[/code] What kind of geek would go around with a Linux-based phone and no Terminal Emulator? ;-)
By the way, inside the directory ./development/apps/ there are more applications that are probably not “enabled” during the build: feel free to try this out to see if you discover something interesting; and don’t forget to let us know in the comments.
Build for HTC Dream aka T-Mobile G1 aka ADP1
The Android uses as default build profile the SDK: means that if you do a build now (remember? the make command), it will build the system image for the QEMU Emulator (the one the Android Emulator is based upon).
So, to build for our phone, we need to play a little bit with the build profile. To do so just follow the official how to page about “Building for Dream”. Of course, “Dream” is the code name of the device used by HTC.
Once ready, it’s time to build! Give a nice make inside the source root directory and give it 10 minutes or several hours: it really depends on your hardware. On my MacBook Unibody 2.0Ghz+4GB Ram it took just 20 minutes ;-)
Fastboot: the tweezers
Let’s assume that you downloaded the Android’s source into the directory /home/me/mydroid: this means that you will then have the built stuff under /home/me/mydroid/out/...; During the building process, one particular executable has been built. It’s name is fastboot and it sits under [code lang=”bash”]/home/me/mydroid/out/host/[your computer platform]/bin/fastboot[/code]
Why is it really important? I’ll report here the output of the executable when no parameter is passed: [code lang=”bash”] $ ./fastboot usage: fastboot [ {option} ] {command}
commands: update {filename} reflash device from update.zip flashall ‘flash boot’ + ‘flash system’ … devices list all connected devices reboot reboot device normally reboot-bootloader reboot device into bootloader
options: -w erase userdata and cache -s {serial number} specify device serial number -p {product} specify product name -c {cmdline} override kernel commandline -i {vendor id| specify a custom USB vendor id [/code]
As you can understand, this is used to flash, reboot, erase, … the ADP1. To do so, the device needs to be booted in “fastboot mode”.
IMPORTANT: You don’t need to do this YET, but I explain it here so you can learn how to do it “regardlessly” the usage you make of it. Anyway, that’s how you go in “fastboot” mode: from power off, hold the “camera” button AND the “red/on” button; this will get you into a mode that says “serial0” with androids on skateboards. Plug in the USB cable and press the “back” button; now you should see that the screen shows “fastboot” instead of “serial0”. Try the back button a few more times (and wait a few seconds in between) if you don’t see “fastboot”.
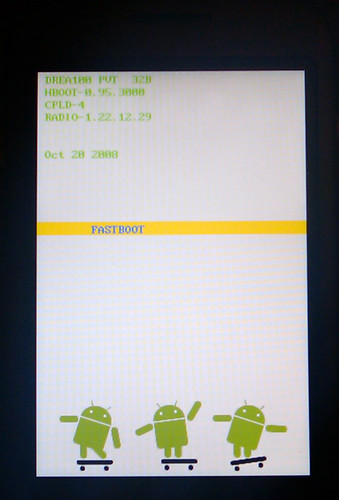 Android in "fastboot" mode
Understood? Ok, now get ready because we are going to need this stuff.
Backup: because you never know
Now, it’s time to pay out your curiosity. You are probably puzzling «WHY THE HELL we need JesusFreke’s Images?». Simply because JF distributes his/her (who knows?) image with a recovery image that we can use to boot the phone from like a “live cd” (so, no installation), and use this image to do a complete backup of the current status of the phone. Very handy when the cold times of failure comes.
 The menu of JesusFreke recovery.img
What you have to do is:
- Unzip the JesusFreke you previously downloaded and bear in mind where you put it (for example [code lang="bash"]/home/me/jf/[/code]
- Put your ADP1 in "fastboot mode" as shown in the previous section
- Now, it's time to boot the phone from the recovery image of JF [code lang="bash"] $ cd /home/me/jf/data $ sudo /home/me/mydroid/out/host/[your computer platform]/bin/fastboot boot recovery.img [/code]
- Wait for the recovery.img to finish booting and use the menu on screen to create a backup; it will be created on the SD card under [code lang="bash"]/nandroid/[/code]
- Once done, use the right option on the menu screen to reboot the phone, mount the SD card on your computer and save the backup somewhere safe
Let's Rock, ehm... flash the Phone
Now we are ready to go! Everything should be already built and we can flash the phone with the latest build. Put the phone in “fastboot mode” again and do as follows: [code lang=”bash”] $ cd /home/me/mydroid/out/target/product/dream $ sudo /home/me/mydroid/out/host/[your computer platform]/bin/fastboot flash system system.img sending ‘system’ (51086 KB)… OKAY writing ‘system’… OKAY $ sudo /home/me/mydroid/out/host/[your computer platform]/bin/fastboot flash boot boot.img sending ‘boot’ (1418 KB)… OKAY writing ‘boot’… OKAY $ sudo /home/me/mydroid/out/host/[your computer platform]/bin/fastboot flash userdata userdata.img sending ‘userdata’ (2 KB)… OKAY writing ‘userdata’… OKAY $ sudo /home/me/mydroid/out/host/[your computer platform]/bin/fastboot reboot [/code]
If everything went right, you should have your ADP1 flashed with the latest build of Android up and running. Enjoy your Geekyness!
Ehm, cooooool! Now how I go back?
Yes, a build made from the repository is not what you would define “a stable release”: most probably a lot of stuff doesn’t not work (like home button and back button in my case), and applications are missing. But you can go to your friend and show how “ahead” you are with your “not-yet-released version of Android”.
But one you are satisfied… or you just have enough of a faulty, incomplete, non-functioning phone, most probably you would like to restore your old, working phone. Nothing can be easier: [code lang=”bash”] $ cd [wherever you stored your nandroid backup] $ cd [your phone serial name]/[backup timestamp] $ sudo /home/me/mydroid/out/host/[your computer platform]/bin/fastboot flash system system.img … $ sudo /home/me/mydroid/out/host/[your computer platform]/bin/fastboot flash boot boot.img … $ sudo /home/me/mydroid/out/host/[your computer platform]/bin/fastboot flash userdata userdata.img (or data.img) … $ sudo /home/me/mydroid/out/host/[your computer platform]/bin/fastboot reboot [/code]
Yes, as you should have expected, exactly the same procedure you followed to flash it with the build you made. It’s called “coherence”, and it’s normally a great feature ;)
Now, the easy way for lazy cowards
There is of course the “do it for me, please” version. The one for “lazy cowards”! :-P People like JesusFreke, already been very useful here, can really make stuff easier for the rest of us. He/She maintains a blog with regular releases of his Android built, based on the stable releases of Google, but enhanced with some “spicy and yummy” stuff. While I’m writing this the latest build for ADP1 is JFv1.43RC9.
To install it, he decided to make it very very easy: he just uses the procedure that Google made for us. So, what you have to do is:
- Download the latest JesusFreke
- Rename it as "update.zip"
- Put on the root directory of the SD Card of your ADP1
- Turn off the Phone
- Turn it on while holding the home button
- Open the keyboard if closed
- Type ALT+L to enable the "logging"
- Type ALT+W to wipe your data from the phone (sorry, it's necessary at the first upgrade)
- Type ALT+S to apply the update.zip
- When done, click HOME+BACK to reboot
Now you have the latest, official and stable build of Android on your ADP1!!! ;) This features stuff like Latitude and more!
Enjoy it for good! ;-)